Configuration files provide an easy and efficient way to manage environment based settings and variables. Xamarin.Android does not natively provide a way to manage configurations for multiple environments.
This post looks at enabling environment based configurations for Xamarin.Android projects.
The source code used in this post is available at Xmarin.Android.Configurations Repo.
Create/Update Build Configurations
Start by creating/editing Build Configurations in your Xamarin.Android project. I generally like to create three environments for most projects:
- Dev
- Test
- Prod
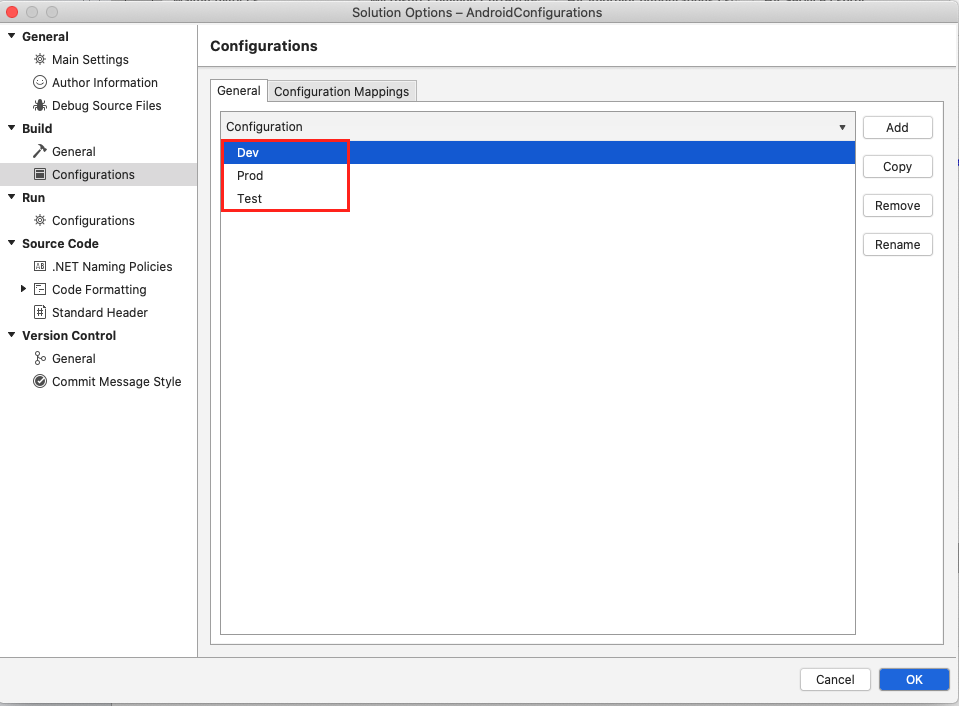 Solution Configuration
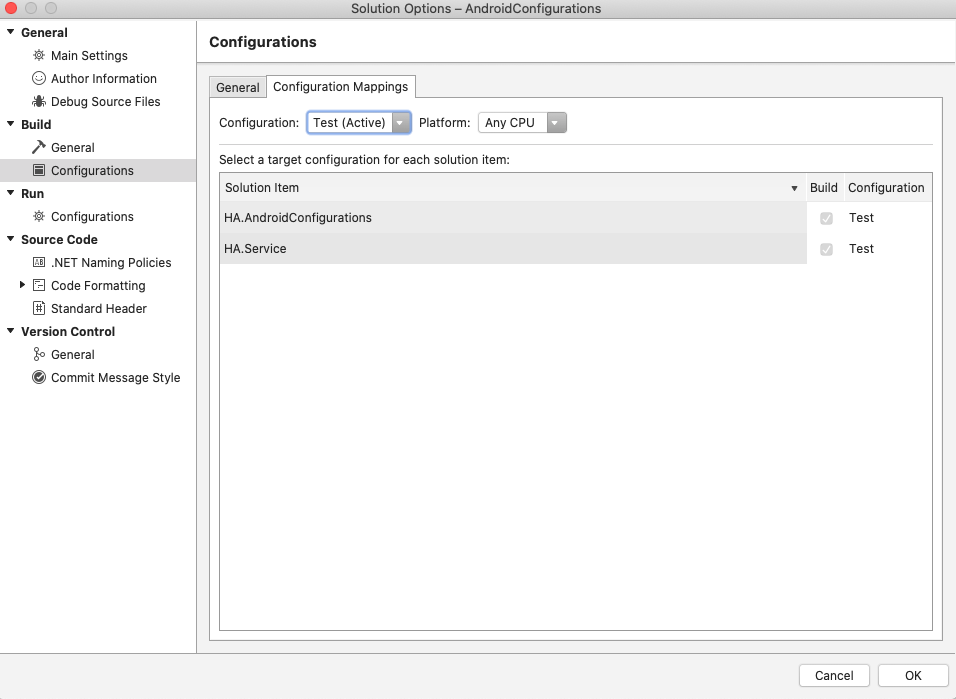 Project Configuration Mappings
You can use Build Configurations that best reflect your environment - or use the default ones
- Debug
- Release
You can find more about Build Configurations and how to create them here.
Configure Android Manifest Files for your Environments
Xamarin allows configuring different Android Manifest files based on the Build Configuration.
-
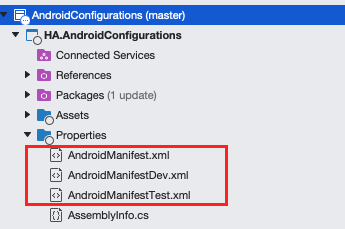
Start by creating AndroidManifest for all your environments. You can duplicate the existing AndroidManifest.xml and rename it for each environment in your solution.
-
Edit your Android .csproj file
- Find the Property group for the Build Configuration and add the Android Manifest tag in it.
- Repeat this process for all Build Configurations in the .csproj file.
Here is how my .csproj file looks like after adding the Android Manifest file for each Build Configuration.
    <!-- Dev Configurations -->
  <PropertyGroup Condition=" '$(Configuration)|$(Platform)' == 'Dev|AnyCPU' ">
    .....
    <AndroidManifest>Properties\AndroidManifestDev.xml</AndroidManifest>
    ....
</PropertyGroup>

    <!-- Test Configurations -->
  <PropertyGroup Condition=" '$(Configuration)|$(Platform)' == 'Test|AnyCPU' ">
    .....
    <AndroidManifest>Properties\AndroidManifestTest.xml</AndroidManifest>
    ....
</PropertyGroup>

    <!-- Prod Configurations -->
  <PropertyGroup Condition=" '$(Configuration)|$(Platform)' == 'Prod|AnyCPU' ">
    .....
    <AndroidManifest>Properties\AndroidManifest.xml</AndroidManifest>
    ....
</PropertyGroup>
Here is how they appear in the solution:
Set up Environment Based Configuration.
Create a folder called Configs in .NET Standard 2.1 project. The benefit of using a .NET Standard project is that the same code can be reused between both Xamarin.Android and Xamarin.iOS.
You can also create this folder directly in the Xamarin.Android project. I already have a project HA.Service that targets .NET Standard 2.1, so I will use it to add the configuration files.
Create config files in the following format, Config <Build Configuration>.json. I have created the following files based on the build configurations in my project.
- ConfigDev.json
- ConfigTest.json
- ConfigProd.json

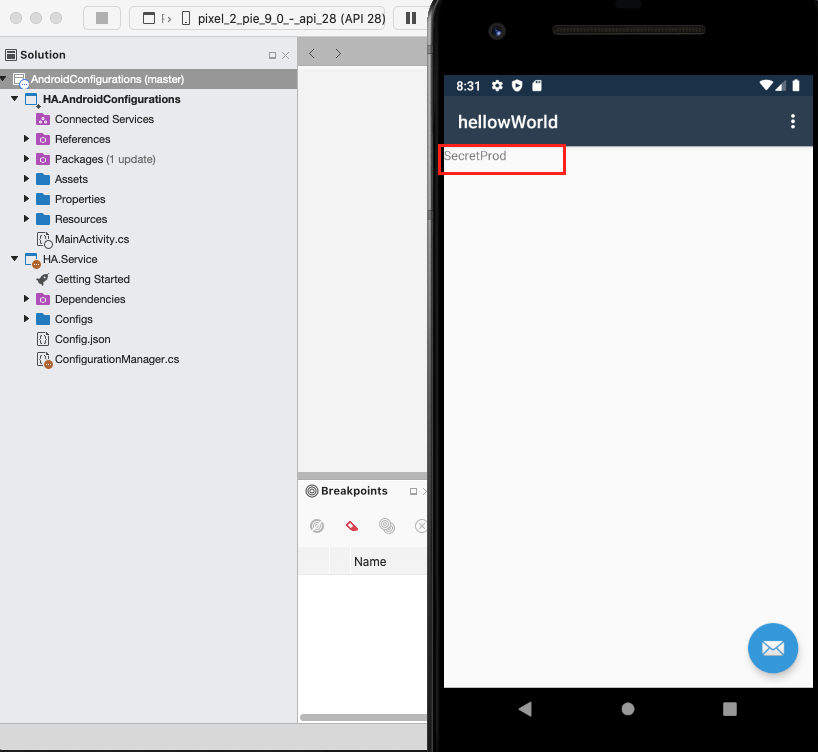
Here is the content for the configuration file I created earlier. You can add any configurations you would like to manage in the file:
{
  "Environment": "Prod",
  "APIEndPoint": "https://exampleprod.com",
  "APIKey": "SecretProd"
}
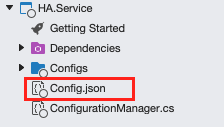
Create a Config.json file in the root directory of the project folder.
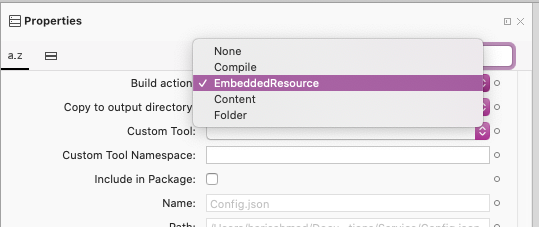
Go to the properties of the file and set the build action to EmbeddedResource. The benefit of changing the build action to an embedded resource is that the file will be embedded in the assembly. We will not have to figure out the path to the config file once the app is deployed.
Learn more about build actions.
Let’s add a task in project to copy the configurations from Configs/Config<Build Configuration>.json to the project root directory. Open up the .NET Standard csproj file and add the following code to copy the files:
  <Target Name="CopyFiles" BeforeTargets="PrepareForBuild">
    <Copy SourceFiles="$(ProjectDir)\Configs\Config$(Configuration).json" DestinationFiles="$(ProjectDir)\Config.json" />
  </Target>
Initially I created the Copy Files task with BeforeTargets=”Build”. However, I noticed that the project had to be cleaned and rebuilt multiple times for the application to pick the correct configuration file. Upon further research, I found that the PrepareForBuild was a better event to copy the configuration file to the destination. After switching to BeforeTargets =”PrepareForBuild”, the correct configuration file was available on every build.
With the basics all set now, all we need to do is add the code to read the configuration file.
Create a class in the .NET Standard 2.1 project that will be used to deserialize the configuration file. I will use the Configuration class defined below. You can add the properties that reflect your configuration structure.
    public class Configuration
    {
        public string Environment { get; set; }
        public string APIEndPoint { get; set; }
        public string APIKey { get; set; }
    }
Create a class called ConfigurationManager and add the following code:
  public sealed class ConfigurationManager
    {
        /// <summary>
        /// holds a reference to the single created instance, if any.
        /// </summary>
        private static readonly Lazy<ConfigurationManager> lazy = new Lazy<ConfigurationManager>(() => new ConfigurationManager());

        /// <summary>
        /// Getting reference to the single created instance, creating one if necessary.
        /// </summary>
        public static ConfigurationManager Instance { get; } = lazy.Value;

        public Configuration JSONConfiguration { get; set; }
        private ConfigurationManager()
        {
            JSONConfiguration = this.Read();
        }
         /// <summary>
        /// Read the configuration files and return Configuration Object
        /// </summary>
        private Configuration Read()
        {
            var assembly = Assembly.GetExecutingAssembly();
            string resourceName = "Service.Config.json";
            string jsonFile = "";

             using (Stream stream = assembly.GetManifestResourceStream(resourceName))
                using (StreamReader reader = new StreamReader(stream))
             {
                 jsonFile = reader.ReadToEnd(); //Make string equal to full file
             }

            var configs = JsonConvert.DeserializeObject<Configuration>(jsonFile);

            return configs;
        }
    }
Let’s walk through the class.
Singleton Class
Create a singleton class. At any time there should only be a single version of ConfigurationManager available.
     private static readonly Lazy<ConfigurationManager> lazy = new Lazy<ConfigurationManager>(() => new ConfigurationManager());

        /// <summary>
        /// Getting reference to the single created instance, creating one if necessary.
        /// </summary>
        public static ConfigurationManager Instance { get; } = lazy.Value;
Get Assembly
Get the current assembly object.
var assembly = Assembly.GetExecutingAssembly();
Set Resource Name
Set the configuration resource name. This is the configuration file that was embedded in the project. You will need to use the full resource name for the file. If the file exists in the root directory of your project, then the resource name would be <Project Namespace>.<filename>
string resourceName = "HA.Service.Config.json";
Read Configurations
Read the embedded resource and deserialize it using JSON.NET to the Configuration Object.
     using (Stream stream = assembly.GetManifestResourceStream(resourceName))
                using (StreamReader reader = new StreamReader(stream))
             {
                 jsonFile = reader.ReadToEnd(); //Make string equal to full file
             }

            var configs = JsonConvert.DeserializeObject<Configuration>(jsonFile);
Sample Usage
That is it. Now you can access the configuration object like so:
   ConfigurationManager configManager = ConfigurationManager.Instance;

   var configuration = configManager.JSONConfiguration